Introduction
The automotive starting system is one of its core functions, acting like a messenger awakening a sleeping giant, translating the driver’s intent into the roar of the engine. Each time you turn the key or press the start button, a complex and precise electrical and mechanical process quietly commences. Within this sequence, the starter solenoid plays a pivotal role—it is both the “commander” of high currents and the “executor” of mechanical engagement. Should it fail, your beloved vehicle could instantly become a motionless hulk of steel. Therefore, accurately understanding and mastering how to connect the starter solenoid is not only an essential skill for professional technicians but also invaluable knowledge for every car owner performing emergency repairs or routine maintenance. This article aims to provide a clear, safe, and practical guide to connecting the starter solenoid, offering an accessible yet thorough analysis of the starting system.
Overview of the Starting System
What is the Starting System?

To understand how to connect the solenoid valve, we must first grasp the “ecosystem” it operates within. The automotive starting system converts the chemical energy stored in the battery into mechanical energy, driving the engine crankshaft to rotate until it can run independently. It consists of four core components: the Battery, which supplies powerful direct current; the Ignition Switch, which receives the driver’s start command; the Starter Solenoid, acting as both a relay and an actuator; and the Starter Motor, responsible for generating the high torque needed to turn the engine.
How Does the Starting System Operate?

The entire process resembles a precise relay race. When you turn the key to the “Start” position, a small current flows from the ignition switch to the control terminal of the starter solenoid. Upon receiving this “command,” the solenoid’s internal electromagnet instantly energizes, generating a powerful magnetic field that accomplishes two critical tasks:
- Acting as a high-current relay: An internal high-power switch instantly channels hundreds of amperes of current from the battery’s positive terminal to the starter motor. This prevents the fragile ignition switch from handling such intense currents directly.
- Engaging the drive gear: Simultaneously, the electromagnetic force pushes a fork, propelling the starter’s small gear (known as the drive gear or flywheel gear) forward. This ensures precise engagement with the engine’s flywheel ring gear.
Once current reaches the starter and the gears engage, the starter spins rapidly, turning the engine’s flywheel and crankshaft. After the engine starts and reaches idle speed, releasing the key interrupts the ignition switch’s current. The solenoid de-energizes, allowing the spring to reset it, cutting off the high current and retracting the drive gear to its original position, completing one starting cycle.
Maintenance and Troubleshooting of the Starting System
Symptoms Indicating Need for Replacement
A healthy starting system responds promptly with a smooth sound. However, encountering the following situations may indicate system issues: hearing only a “click” when turning the key with no engine response; weak starting sound and slow cranking speed (“lacking power”); or complete silence and no response. These symptoms indicate potential faults within the starting system.
The Importance of the Starter Solenoid
As evident from the operating principles above, the starter solenoid serves as the critical “throat” of the entire system. It functions not only as the electrical circuit’s hub but also as the origin point for mechanical action. Its condition directly determines whether the battery’s powerful energy can be smoothly and promptly transmitted to the starter motor, and whether the mechanical components can engage precisely. Even minor contact issues or internal wear can cause the entire starting process to fail.
Symptoms of Starter Solenoid Failure
Accurately identifying the fault source is the first step to successful repair. Starter solenoid failure typically exhibits distinct symptoms that differentiate it from a dead battery or a damaged starter motor itself:
- Distinctive “Click” Sound: This is the most typical symptom. When you turn the key, a loud “click” is clearly audible from the engine compartment, yet the starter motor does not rotate. This usually indicates the solenoid received the ignition switch signal and attempted to engage (producing the “click”), but its internal main contacts failed to successfully conduct high current due to burnout or damage.
- Intermittent starting failure: Sometimes the vehicle starts normally, while other times it shows no response, only succeeding after multiple attempts. This may indicate poor contact within the solenoid’s internal contacts or unstable coil performance.
- Continuous starter operation: In rare cases, the solenoid switch may “stick” after engine start-up and fail to disengage. This causes the starter motor to continue idling while the engine runs, producing a high-pitched noise. This condition can rapidly damage both the starter motor and the flywheel ring gear.
Starter Solenoid Installation and Replacement

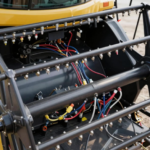
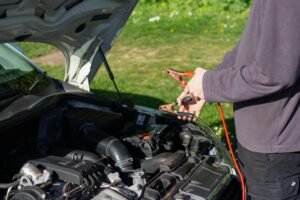
And now that this theoretical and checking knowledge had been covered, we can finally get to the meat-and-potatoes—that is — Wiring up the starter solenoid. Since a worn or broken solenoid / brushes are the most common failure for those starters, whether you’re on a quest for knowledge or prepare to replace YOUR solenoid, this guide will be of benefit.
Safety First: Preparatory Work
The first thing to do, even if you are doing nothing more than accessing your electrical system for other work is to disconnect the negative terminal on your battery! This design helps avoid accidental short-circuits protecting you and your vehicle’s electronic components.
How to use the starter solenoid valve?
A typical starting system has two naturally occurring operating positions and is commonly known as an on-starter arrangement. And it is important to know what each terminal does when connecting them up.
- Identifying the Terminals:
- B Terminal (Battery): The largest stud that is labeled “B” or “BAT”. It is attached to the fattest power cable on the batteries positive. This is the main power input.
- M Terminal (Motor): This also is a large stud or thick braided copper wire usually labeled “M” or “MOT”. It links the solenoid switch output to starter motor internal circuit. This is the positive power output terminal.
- S Terminal (Start/Switch) (20-18): This is a smaller stud or blade terminal that’s often labeled “S”. It is the point where the control wire from the ignition switch (normally a thinner wire) connects. At the cranking of the key start, this terminal obtains a signal voltage of 12V as a starting signal.
- I Terminal (Ignition) (Some Earlier Vehicles): Some previous versions may also have a small terminal with the word “I” which enables bypass of the ignition resistance wire when starting, delivering full voltage to the coil. This is now uncommon.
- Connection Steps:
- Step 1: Hook up the Power Source.CommandText:SetText The primary power supply Then use an additional cable from that power supply to connect a floppy drive. Bold the thickest cable (from the battery positive post or power distribution center which has bolted connection to the same) securely and tightly on solenoid’s B terminal using provided nut. Make sure the contacts are clean and corrosion free.
- Step 2: Connect motor power lines. Attach the heavy wire (commonly a built in copper strip) from the interior of the starter motor to M terminal and tighten the nut.
- Third step: The control signal wire is connected. Connections to an ignition switch, thin wire from the ignition switch Attach the thin wire from the ignition switch to the S terminal. In the case of stud connections, use a small nut; in the case of blade connects, insert them perfectly.
- Step 4: Inspect and Secure. Inspect all connections to be sure they are clean and secure. Any poorly connected circuit will have large resistance and may start to warm up, reduce the voltage or simply refuse to start.
Diagnosing Starter Circuit C
To check after connected (if still not works go to my point below) now for a quickly test, if it does work:
- Voltage Check: Connect the battery and measurement B post through multimeter. It should read 12V at all times, ask an assistant to put the key down on the “Start” position and meanwhile test the S terminal. It will also read 12V – if it isn’t again the problem is the ignition switch or the wire to the solenoid.
- Jumper Test (Caution): By applying the voltage in test mode, briefly connect A and S terminals with a thick cable under the professional supervision. If the solenoid clicks and turns the starter motor this means your solenoid and starter are doing fine. The problem is in the control circuit from the ignition switch to terminal S.

Conclusion
The starter solenoid valve may be small, but it is the heart of the car—a crucial component that determines whether the engine can be awakened. It serves as both the intelligent “commander” and the powerful “transmitter.” Understanding its working principle and proper connection methods is fundamental to troubleshooting automotive starting failures. In routine maintenance, keeping the battery terminals and solenoid valve wiring terminals clean and securely fastened is the simplest and most effective way to prevent starting issues.
As a vehicle ages, the solenoid’s internal contacts may wear down due to arc erosion, and coil performance may deteriorate. Therefore, when encountering the typical fault symptoms described earlier, do not hesitate—promptly inspect and replace the solenoid. A successful start begins with a healthy solenoid. Regularly inspect the electrical connections of the starting system and decisively replace faulty components when necessary. This not only prevents the embarrassment of being stranded on the road but also ensures the long-term reliable operation of your beloved vehicle.
But no matter what kind of help you need, Jinhai is always available to provide you with the best automobile wire harness solutions and guides to ensure your vehicle is always running.